LEE FILTERS - to join the list of people waiting for theirs from back order..... or to settle for something else?? Disclaimer: I am not being paid by ANYONE to put out this mini review.
Most people want Lee Filters, but get frustrated because they're on back order. You can add your name to the list of people waiting for theirs to come. I have managed to get my hands on their 3, 6, 9 ND set as well as their 3, 6, 9 GND set, the square full red, and the sunset set (half red, half orange, and half yellow.) I also have a Tamron half red and a Tamron half blue. In addition, I have a whole bunch of home-made filters, but that's another post worth of information.
While using a filter, I can indeed produce a SOOC image that is (from my perspective) better than the one I could produce with layers in photoshop with no filter use. I also find that to properly use LEE filters, one needs to know how to use the white balance on their camera to better amplify the effect of the filters (or you can do it in photoshop, but that doesn't typically turn out as nice). What I'm saying is that when you use filters, you're better off NOT shooting on AWB.
Lee is the top-of-the-line company, but if you don't want to wait or don't want to pay that much (remember that a British Pound is currently $1.55) here are some you could substitute as kits: HiTech, SinghRay, Tamron. Don't substitute Hoya or Cokin. Honestly I think my Hoya is best used as a Frisbee. Cokin only produces graduated color filters, and there is a big difference between that and a graduated gray filter. I can't speak about their quality, as I don't use their products.
Things I like about LEE: they are very compatible with my light meter. Some others I have borrowed have done wacky things to the light meter that make it annoying to shoot - you basically have to guess and check on exposure until you get a feel for whether it sits at +2 or -2.
Like all filters, Lee's products are not scratch proof. However, they come in a great cloth case and cardboard box. You can buy their filter pouch for like $7 and that's well worth the price as well. The square ND filters are best kept in the cardboard box. Don't screw up that box!
I don't have much negative to say about the filters except I wish they weren't so hard to obtain.
I will also say that the LEE grad colors out-perform my Tamron grad filters. However, if I tweek my white balance, I can achieve the same result with the Tamron product as I could with the Lee's.
About my LEE Holder
It is larger than other companies' holders, which is very convenient. It holds larger filters (4"x6"), and is great construction. I love the quick release! I can take it off the 77mm (filter size) ring and put it on the 82mm easily and quickly. It's also drop proof by the way.
I wish the attachment (the part that the quick release releases from) screwed onto the lens like either a lens cover or filter does. It's kind of a pain in the neck to attach to my lens quite honestly. It's so much of a pain that I wish I could just leave it permanently on my lens - but if I leave it on and release the holder, I have to take it off to use a lens hood or a filter. It's more than a little annoying, and I have seen better schematics on my friends' cameras.
I wish it had a slot for three filters instead of two (they make a part you can add on, but it's always sold out so if you want to use three filters and have one stay tuned as I am making something and will blog about it once it works the way I need). I find myself sometimes hoping I could use 2 grad colors and an ND but I can't because there are not enough slots to hold them. If someone can find me a 3 slot LEE holder I'd sell my 2 slot holder.
I wish there were a way to use the LEE holder with a circular polarizer on the lens. They sell a "circular polarizer front mount thread" but is back ordered (of course.) I am going to attempt to make one of those as well from a step-up ring.
Showing posts with label post-processing. Show all posts
Showing posts with label post-processing. Show all posts
Wednesday, February 29, 2012
Pinup Photography With Limited Photoshop Use
Question: “Do you use Photoshop for your pinup photographs?” Yes. I do. Photoshop is a tool used by most professional photographers because it allows photographers to transform a standard scene into a work of art. HOWEVER most (but not all) professional photographers also tend to use the camera for as many effects as possible.
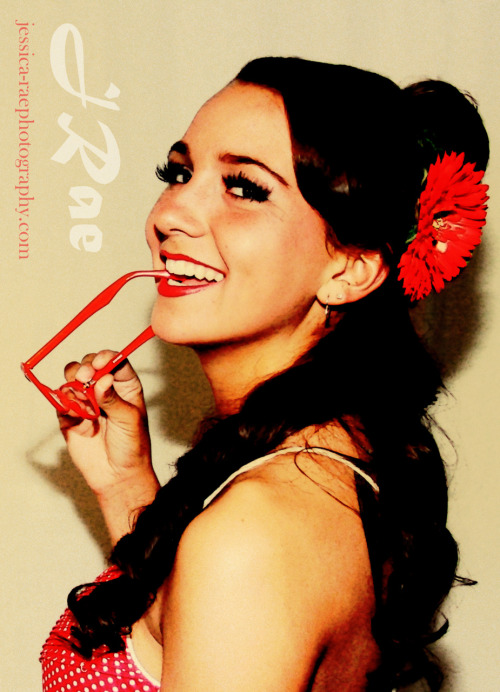
How did I use my camera as much as possible for this photograph?
1. I set the white balance on my camera for orange/yellow hue lights. Most DSLR cameras have a setting for this, but I like to use the custom setting.
2. I used orange/yellow-toned lighting in the studio (warm-toned light bulbs) with a diffuser. In my case - I used a semi-worn-out quartz lighting system with a white backdrop.
3. I used my camera on MANUAL MODE. Set your ISO to 80 or 100 and then use different f-stop and shutter speed settings to accomplish a slightly over-exposed photograph. Don’t over-expose it too much because it will wash out the colors. You really only need one stop.
4. I used a flash with a diffuser. This helps to bring out some of the more vivid colors - in her case her dress. The dress was actually fire-engine red so it washed out the colors a little. I would suggest having your model wear vivid colors.
5. I use lens filters: Diffusion filters have been very helpful to me for pinup. I recommend one with a slight amber tone.
6. I shoot in RAW so that I can tweak the exposure if I need to during the development stage
The after-effects are MINOR and include layers in photoshop. One thing that I usually always have to do is invert the most-important features of the photograph (select the smudge tool and then press Ctrl Alt 2 in CS4. In CS3 I think you use Ctrl Alt ~). Paste them to a new layer and select overlay. You will see that this makes a big difference.
Sometimes I add a layer blended to MULTIPLY using the photocopy filter in Photoshop. It helps define the differences around the model and helps it to have the aged look.
Another thing I typically do after the fact is add a layer of 50% gray blended to overlay with the color removed. I like to do this because adding graininess also helps the photo look aged.
So there you go. I hope this post helps to answer questions about pinup photography.
Subscribe to:
Posts (Atom)