This site is NOPIN - No pinning on Pinterest.

Showing posts with label photograph editing. Show all posts

Sunday, March 25, 2012

How I Edited "The Egyptian Lady" in Photoshop

This is a step-by-step guide for beginning photographers using photo shop to reveal the steps this photo took between the before and after. This is Adobe Photoshop CS4.


Before I get started... how about some technical details? Those are a big part of why I chose this image. I didn't use a lot of equipment for this shot. =)

It was shot with my Canon Rebel xTi / Canon EF 50mm 1.8 / WB for tungsten light / f4 at 1/500.

Step One: Decide whether you want to leave the image in color, or change it to black and white. Despite her face matching the tones of the wall, I decided to change this one because I thought I could achieve more depth with black and white.

Step Two: Convert to Black and White I converted this image to black and white by going into the Adjustments sector on the right hand side, and clicking on the carrot to show more "Black and White Presets." I then selected the preset called "Maximum White." 

In this case, the preset worked for me just fine, and so I decided not to move any of the sliders, and just left them all at 100. However, you can move them if you want.

Step 3: Duplicate the Original Layer This step is a preparation for dodging and burning. In this step, I like to make sure I have a copy of the original image un-touched. That way I can go back if I take the dodging / burning too far. You can also duplicate the layer more than once if you want more place holders (just in case) so you don't have to redo all your work if you decide you don't like it.
By dragging that background to the duplicate layer button, you will get a "background copy" like the one shown above your background layer.

Step 4: Dodging and Burning by switching between the dodge and burn tool, you can make the darker parts darker and the lighter parts lighter or vice versa. To do this, select the "burn" tool along the left side. It is in the same spot as the "dodge" tool, and you can switch between them by right-clicking the icon and choosing the other one.
You can change the size of the brush, the range, or the exposure up at the top. I suggest a low percentage for the exposure, or it may be too much. (Don't use the 74% that is shown here - try using 10% or lower to start with.) Go ahead and play with them to see what you like best. Make sure you have "protect tones" selected or you will end up with different tones to your image.
For this image, I dodged her face just a tad, and I burned a few of the darker areas just a tad.

Step 5: The Black Brush This is something I don't typically use for my images, but I grabbed some of the color from her shirt with the eyedropper tool and then painted over that line (which is a papyrus reed) along her shirt. It didn't add to the photo, and in fact just distracted the eyes of the viewer.

Step 6: The Vignette If you have Adobe Lightroom, they have a feature that automatically puts in a vignette. I don't like it. Most of my subjects are not dead center in the photo, so I need a custom one. For this I will either use the brush again or burn with a high exposure percentage to make it dark around the outside. There are other ways, but this is the way I believe to be the simplest.

Wednesday, February 29, 2012

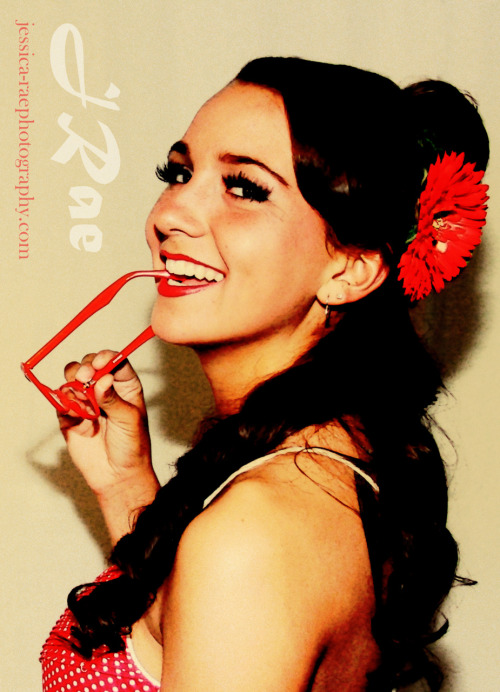
Pinup Photography With Limited Photoshop Use


Question: “Do you use Photoshop for your pinup photographs?” Yes. I do. Photoshop is a tool used by most professional photographers because it allows photographers to transform a standard scene into a work of art. HOWEVER most (but not all) professional photographers also tend to use the camera for as many effects as possible.

How did I use my camera as much as possible for this photograph? 

1. I set the white balance on my camera for orange/yellow hue lights. Most DSLR cameras have a setting for this, but I like to use the custom setting.

2. I used orange/yellow-toned lighting in the studio (warm-toned light bulbs) with a diffuser. In my case - I used a semi-worn-out quartz lighting system with a white backdrop.

3. I used my camera on MANUAL MODE. Set your ISO to 80 or 100 and then use different f-stop and shutter speed settings to accomplish a slightly over-exposed photograph. Don’t over-expose it too much because it will wash out the colors. You really only need one stop.

4. I used a flash with a diffuser. This helps to bring out some of the more vivid colors - in her case her dress. The dress was actually fire-engine red so it washed out the colors a little. I would suggest having your model wear vivid colors.

5. I use lens filters: Diffusion filters have been very helpful to me for pinup. I recommend one with a slight amber tone.

6. I shoot in RAW so that I can tweak the exposure if I need to during the development stage
The after-effects are MINOR and include layers in photoshop. One thing that I usually always have to do is invert the most-important features of the photograph (select the smudge tool and then press Ctrl Alt 2 in CS4. In CS3 I think you use Ctrl Alt ~). Paste them to a new layer and select overlay. You will see that this makes a big difference.

Sometimes I add a layer blended to MULTIPLY using the photocopy filter in Photoshop. It helps define the differences around the model and helps it to have the aged look.

Another thing I typically do after the fact is add a layer of 50% gray blended to overlay with the color removed. I like to do this because adding graininess also helps the photo look aged.

So there you go. I hope this post helps to answer questions about pinup photography.